If you're new here, you may want to subscribe to my RSS feed. Thanks for visiting!
Growing a successful garden can be hard to achieve depending on where you live. I began gardening in the Chicago suburbs, a wonderful place in which to grow things. The seasons were regular, the rain was abundant, and the soil was fertile.
However, much of the country is not like that.
When I lived in the Houston suburbs, the summers were too hot for fruit to set. On the High Plains in Colorado, our weather is wildly unpredictable. May can bring 80-degree weather or snow. It’s not unusual to have both. To deal with this, I’ve learned to love season extenders. As we’ve discussed on this website, becoming productive is more important than ever.
Successful Garden Tip 1: Keep your plants warm with straw
Commercial growers in my area have hoop houses, the kind you buy from places like FarmTek. I flip through their catalogs and dream about future projects. But I’m also a fan of simple, and for simple cold protection, you can’t beat dirty animal bedding.
I usually plant peas, potatoes, and leeks in April because the very hard freezes are generally over by then. However, last year, in mid-April, we had a week of January weather. The highs were only going to be in the 40s, and the nights were dropping to between 10 and 15 degrees.
I didn’t want to lose my seedlings. So, I buried them in about a foot of soiled straw from my goats and alpacas. Then I topped it off with some pine needles I’d gotten from friends living in the suburbs. When the weather warmed up a week later, I uncovered the plants, and they were fine. They were definitely ready to see the sunshine again, but they survived. I only lost a few days of growth, rather than three weeks, if I had to replant.
Successful Garden Tip 2: Cloches
Not everyone has access to soiled animal bedding. A technique more popular with suburban gardeners in my area is to use cloches. Cloches are any small, transparent covers you can use to protect young plants from frost. You can probably buy them.
In my area, people reuse gallon milk jugs as cloches. Take an empty gallon milk jug, cut off the bottom, and then partially bury the jug around each plant so it won’t blow away (I live in a very windy area, so this is important).
It’s not unusual to see milk jugs all over people’s properties this time of year. The nice thing about milk jugs, too, is that you can leave the cap on if the weather dips below freezing or take it off when the sun comes out. You have a bit of control over the temperature surrounding your plants.
Note: If you’re not a milk drinker, you can put mason jars over your plants at night, too. But, you must remember to remove the jars as soon as it warms up. You can’t ventilate the jars the same way you can with the milk jugs.
Successful Garden Tip 3: Cold Frames
I start many of my seeds indoors in March. Size-wise, many of them would like to be in the ground in May. But, sometimes the highs are only in the 60s and still dropping into the low 40s at night. That is just too cold for tomatoes and peppers to go in the ground.
The weather tricked me when I first moved to Colorado. One week in early May 2015, we had a week of 80-degree temperatures. I figured the soil would be warm enough to plant tomatoes outdoors. The following week saw highs only in the 60s. My tomatoes were sorry-looking. I dug them all up and put them back inside on my grow table for another two weeks.
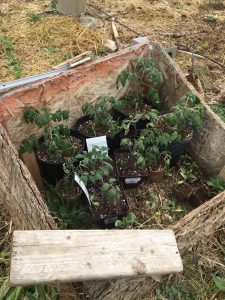
Dragging plants in and out gets old. I eventually built cold frames.
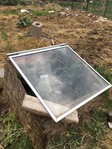
I got the window from ReStore for $5 and bought a hinge from Home Depot for a couple of dollars. I used scrap lumber from previous projects. The whole thing cost less than $10. I had built more, but the rest of the glass got broken in various hailstorms. If I were to replace them, I would probably spend more time looking for heavy, clear plastic.
I can close the lid of the cold frame at night and open it during the day. It’s also nice for high-wind days. It’s not unusual, especially in the springtime, to have days with sustained winds over 20 mph accompanied by gusts of over 40 mph. The wind is tough on small plants. If it’s sunny, I can prop the lid slightly open. The cold frame protects the plants from the wind and they still get light and ventilation.
Successful Garden Tip 4: Protecting your plants from heat
On the High Plains, I’ve had to protect plants from cold and windy spells. However, when I lived in Texas, we had to worry about blistering heat. With proper planning, we could garden year-round in the Houston area. The winter garden was easier than summer gardening because it didn’t drop below 25 degrees most years. Plants like garlic, onions, kale, chard, carrots, and turnips did just fine without much help from us.
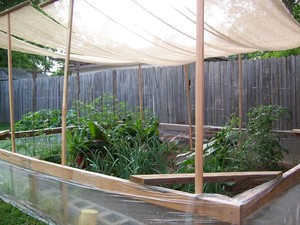
We decided to try using shade cloths. My then-husband made frames, and we draped burlap over them. We screwed the posts into our little fence surrounding the garden. That made it easy to take up and down as needed. Now that I live in a more rural area, I see people bending hog or cattle panels into semi-circles and then draping cloths over those. I also see people draping thick plastic over them. You could just as easily drape fabric over the frames if you needed shade.
Successful Gardening Tips From The Organic Prepper
Daisy has written several articles on the importance of becoming a producer, and Erica just released a book on homesteading. Producing some or most of your food is a huge step in household resilience, particularly if you have children. Those of us with children go through mountains of food. And we also have little helpers with the myriad tasks that go along with gardening.
You may think that you don’t have a suitable climate for gardening. Some places are easier than others, for sure. But there are many minor tweaks and adjustments you can make. Season extenders are an excellent way to make growing your food more realistic.
Do you have tips you can share with other readers about gardening in tough climates? Have you ever been tricked by the weather and learned from it? Share your experiences with gardening in the comments below.
About Joanna Miller
Joanna has been homeschooling three children since 2012. In 2014, she moved to the High Plains of Colorado. She and her children began a little homestead, gardening and raising chickens for eggs and meat. One animal led to another, and these days they have livestock guardian dogs, chickens, geese, ducks, alpacas, goats, pigs, and one very spoiled cat.








6 Responses
I have used hay to keep the livestock water from freezing. It is only when we get prolonged days of single or negative digit temps does the water freeze.
I use 1inch PVC pipe and ag-grade plastic to form mini-hoop houses or large cloches over the raised beds. Then, if we are expecting a cold snap, ag-grade cover cloth.
Is tip #4 missing?
Might have to try the shade cloth.
Thanks for the editorial fix!
The single most important change I have made to growing has been selecting for and searching out from other sources local resilient plants and seeds from other growers.
I have learned to love the food plants (and flowers) that love it here–where ever here is!
Beans, sourced and grown out with quite a bit of difficulty, that were Native American from a tribe that populated our land hundreds of years ago (pinto like and delicious!). Chard that all but over winters. Kale that grows so happily that we actually have sometimes needed to mow it between the shed and garden when the seeds blew. Potatoes that have managed to grow despite drought or flood. Sweet potatoes that can handle the cold. And squashes from the compost pile that cure and keep all winter.
Sure, we grow lots of more fussy plants but we have a framework of tried and true plants to keep us provided when conditions are difficult.
That’s why it’s important to be in contact with other LOCAL gardeners and farmers–we all love to share our successes and to horrify with our failures. And seeds….lots of seeds.
I couldn’t agree more with finding well-adapted seeds, as well as like-minded friends in the community. Thanks for your input!
High mountain desert. 6,280 ft elevation Western NM desert. I love gardening but some years its a pain. January type zoo storms this year in April, and here we are in late May days 55 and days 82 all within a week. Nights 52 and 38 all in the same week.
I use old glass doors laid over a cinderblock box. I have 1/2″ pictures and sheet plastic and a 50×60 insulated foam garden blanket. Saved leave fron the old cotton wood become mulch in the garden and ground cover in the chicken coop. Last year we had weeks of 100 degree weather. If I’d had a garden I’d have needed shade cloth on fra n especially for some things. I’ve been here 45 years. I save seed from all successful crops. Some seem to be getting acclimated. Many are old family heirlooms and some are either traded for or purchased heirlooms. I grow blue corn and white corn from local Native tribes. A 55-60 day dwarf sweet corn from an Aunt the lived most of her life in Idaho. A beautiful mostly red Indian corn from a Crow Indian family in Montana. Yellow beans grown by another Aunt on an Oregon Reservation. A gray Hubbard heirloom from the mountains on the Navajo Reservation. I grow boc choy each year. They are so cold hardy some will winter over on the Iess severe years. I have thrown blankets and sheets over tomatoes and harvested slowly ripening fruits under a foot of snow. I’ve watched for wild vegetables from the mountains worldwide. I order and try the seeds. I look for wild edibles here and gather seed to naturalise in my yard. We have a wild amaranth here that just grows a scrawny 18″-24″ but if allowed to grown where I’ve scattered rabbit droppings they grow 5″ tall, have leaves the a I’ve of a medium glove and a seed head 5″-8″ tall and 2″-3″ across at every stem. Two years I let them take over the garden rather than gamble on second crops. We ate all the greens we could hold all fall and canned many pints and saved 1/2 gallon of seed.
Sunchokes do well here and take little if any care. If it looks like we will have an extra hot summer I grow more dry beans including tepary that are native at lower hotter altitudes. I grow several family heirloom beans but pintos are a favorite. We eat all the green beans we desire then let them n azure and dry on the bush. I grow runner beans on trellis edges, climbing corn stocks, even an old handmade chair. I mixed many flowers through the garden for plant health. Some repell pests while others draw pest away. I have fun looking for short season crops to try. Some work out and some don’t. 60 day cabbages are surprisingly good. I make coIeslaw from them. I have redclover, peas, and buckwheat for covercrops. Building up rich soil and is a slow process.
I don’t have bags of leaves or grass clippings but if I see a bunch for free I’ll pick them up for mulch or composting.
Since I haven’t yet gotten a walapini dug, I start flats of seeds on metal shelves in front of my living room northeast windows. Once the seeds sprout and grow one to three weeks I move the seedIings to the hotbed under the glass doors. Then I plant in the soil under covered pvc hoops if its something that will need a longer growing time and may get caught in fall freezes or if it might need summer shade.
I grow with little bare dirt. Planting close but not too crowded to produce. It saves water, weeding work, and by the heat of summer the roots are shaded.
I live in Texas. Just on the Western edge of the Hill Country. Although we have beautiful rivers here, we can also experience drought.
One year our well went dry. We dug another one and 6 weeks later it went dry as well. Lesson learned. Now we store water in large tanks.
But, gardening with limited water can be a challenge.
Solution: Soda bottles. Save the bottles – both single serve and 2 liter. Drill holes in the body and on the bottom of the bottle. Bury it by your plants and when watering direct most of the water into the bottle. This will water the plant roots without wasting water on just the surface of the soil.