If you're new here, you may want to subscribe to my RSS feed. Thanks for visiting!
I have a strange fascination with knots and ropework right up there with rutabagas and searching for the perfect meatball and air guns.
(An odd mix, eh?)
Knots and ropework are skills and knowledge I think every prepper should have. I will be writing about various knots I have used here on the farm in practical uses, and some knots that I feel could be useful. While there are enough knots known to fill more than a few books, I will concentrate on what I think are some of the more useful ones.
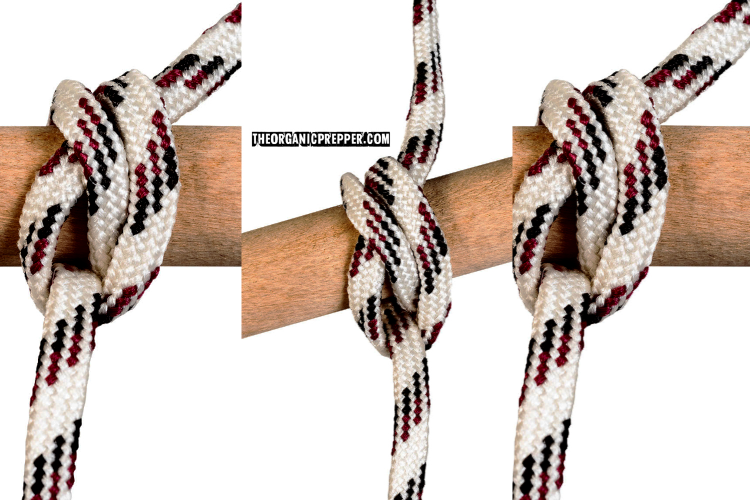
In this particular case, let’s say you are trying out using a tarp for lightweight camping using 550 cord. This bend/hitch would be used for the corner eyelet of your tarp. Imagine the carabiner is the eyelet.
Technical Information
Note: For instructional purposes and clarity, I did this ropework using a 5mm accessory cord. When I tried 550 cord, the black and OD green cord did not provide enough contrast to effectively render the pictures. The carabiner was not only used for clarity but as an example. The same knot/hitch could be applied in any number of manners.
- The end of the cord/rope that is being worked is called the running end.
- The end of the cord/rope that is not being worked is called the standing end.
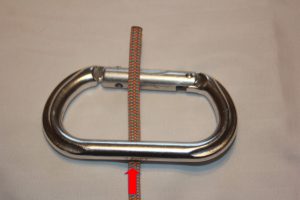
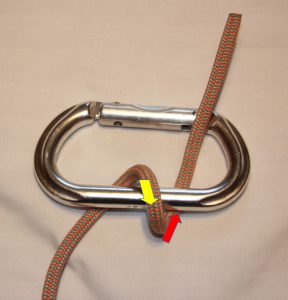
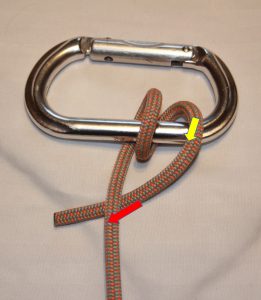
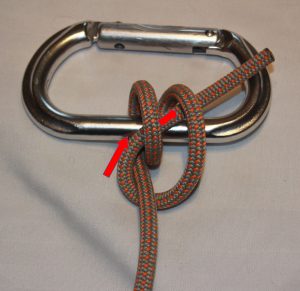
- Red arrows/graphics indicate the direction and path under/behind either an object (e.g., carabiner, eyelet, rail, etc.) or cord/rope.
- Yellow arrows/graphics indicate the direction and path over/front either an object (e.g., carabiner, eyelet, rail, etc.) or cord/rope.
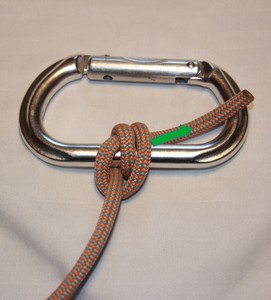
- Green arrows/graphics indicate the direction of applied tension of cord/rope.
The Gaff Topsail Halyard Bend/Hitch
Step 1: Bring the cord/rope under the object.
Step 2: Bring the cord/rope around the front and then behind, making one wrap.
Step 3: Bring the cord/rope around for a second wrap and tuck behind the standing end.
Step 4: Bring the running end around the standing end and then through the two wraps.
Step 5: Pull on the running end to secure and complete the bend/hitch.
Next Week: I will illustrate an adjustable hitch to secure your tarp to a tent stake or tree.
About 1stMarineJarHead
1stMarineJarHead is not only a former Marine, but also a former EMT-B, Wilderness EMT (courtesy of NOLS), and volunteer firefighter.
He currently resides in the great white (i.e. snowy) Northeast with his wife and dogs. He raises chickens, rabbits, goats, occasionally hogs, cows and sometimes ducks. He grows various veggies and has a weird fondness for rutabagas. He enjoys reading, writing, cooking from scratch, making charcuterie, target shooting, and is currently expanding his woodworking skills.








24 Responses
While I have a whole book full of knot tying types, in practice I’ve never needed much more than the five or six basic knots taught by the Boy Scouts many years ago. Those include the overhand, the clove hitch, the bowline, the tautline hitch, the sheetbend, etc.
However I can’t resist suggesting an alternate title for this series of knot-tying articles to come — the “tying one on” series. [grin]
–Lewis
@Lewis,
That was funny and terrible at the same time!
I will see if Daisy agrees and make the change.
Thanx for the laugh, Lewis!
Hahaha I love that, Lewis!
Super-simple to understand and recreate! Thanks very much for this!
@Wendy,
Some of the books I have, despite the photos and the instructions, are still hard to follow. Hence the color coded arrows.
You are most certainly welcome and thank you for the feed back! 🙂
Thank you for sharing this great tutorial – super easy to follow with the arrows!
@AB,
You are welcome and thank you for your feed back!
Great instructions, thanks but admittedly I did have to look up 5mm accessory cord. Perhaps for a future article a cord-rope primer for us newbies.
@Coraire,
Good point!
Will have to drum up an article for that.
Thank you!
Great information, clearly presented. I’ve never tied more than a sewing knot, so appreciate the tutorial on a skill I need to develop. Thanks!
@Pat,
You are welcome and thank you!
I made a knot display board as a 10 year old when I earned a badge – patch in knot tying. I’m afraid I’ve forgotten most. I can still look at most knots and figure out either how they were tied or how to undo them. I’ll be glad to see more knots. They can ve very handy if used appropriatly.
@Clergylady,
In the future I am planning on not only knots, but weaves that I have used too.
Thank you!
Simple knot, easy to follow instructions! Looks like it will hold well, too. Thanks for bringing this new knot to my attention. This one is easy enough to remember how to tie it.
@RayK,
Off the top of my head, I can think of two Anchor Bends, and two Cow Hitches, but I felt this one is easier to tie and to remember.
It was originally used on old wooden sailing ships for securing sails, and rigging.
Glad you like it.
Thank you!
I can never remember how to tie a bowline, and even if I did remember, I can remember that once put under load, they don’t untie easily.
I do a lot of electric fence work with plastic rope and needed a knot that could be easy to tie, easy to untie, and easy to remember. I settled on the Midshipman’s Hitch, but don’t take advantage of its ability to adjust. It holds well and it unties well. I can tie it snug without leaving unwanted slack in the working line.
This knot, and I’ll never remember the name of it, might be a good replacement for the Midshipman’s Hitch.
I’m months overdue to do fence repair, but it’s full-on ‘ice storm coming’ winter, so I’ll have to wait a bit to try the new knot. (Forecast for central Kentucky is up to 3/4″ of ice and 4-8″ of snow on top of that.)
Bowline is a good one.
But which one? There is the traditional one, the Spanish bowline, the Portuguese bowline, Portuguese bowline with splayed loops, the Eskimo bowline (no kidding) and probably another half dozen or more variants of those. And there are differing ways of tying each one of those.
Bowline is a future article I will write but keep it simple.
For all accomplished knotheads and even enthusiastic wannabees, there is the International Guild of Knot Tyers:
https://en.wikipedia.org/wiki/International_Guild_of_Knot_Tyers
–Lewis
Thank you for posting the resource Lewis.
Great article! Useful knot, and actually easy to understand unlock quite a few other knot tying articles. Arrows were a very good idea. It’s way better than my usual complicated cluster of granny knots!
Thank you RedBranch!
I am trying to keep with the more simple, easy to tie, easy to remember but are useful and secure.
And ones that I have actually used.
Great topic! I have knots in my childhood Girl Scout books as well as in my dad’s old copy of Chapman’s Piloting book.
Being a qualified tall ship captain you must never make a halyard fast as in the picture.
A halyard which raises and lowers a sail or yard is always wrapped around the belaying pin to secure it, never locked off or left in a configuration which allows the line to jam as a halyard must be able to release quickly, it carries a huge load.
This is great. Easy to explain & visualize. Something I find lacking in many written knot lessons. PLEASE: one suggestion, maybe include a little more about where & how the knot works best with some more practical examples to help me make then connection to why I must know this knot beyond my own intellectual eddification. There are a hundred times I have been doing something real-life and asked myself, “Self, what the heck knot would I use here?” But in real-life found no caribiners or colored arrows to help me. PS. Regarding the groaner knot puns—they are KNOT punny. And I should know I used to live in Pun-sylvania.