If you're new here, you may want to subscribe to my RSS feed. Thanks for visiting!
For more garden how-tos, check out our Home Agriculture Comprehensive course
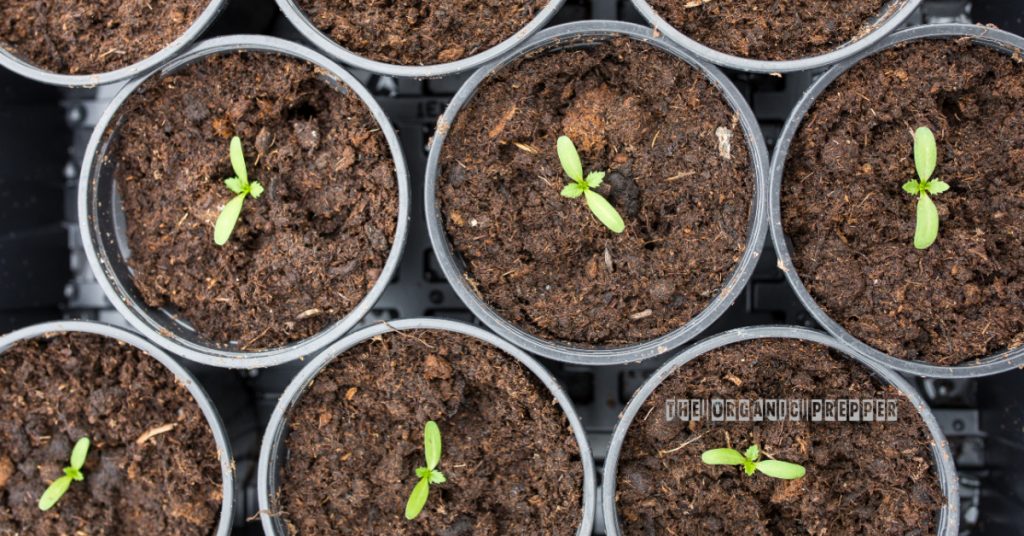
Gardening season is nearly upon us! While those of us in the colder zones are merely sorting seeds and preparing spaces indoors, gardeners in the warmer regions are already starting their seedlings.
New gardeners may be feeling overwhelmed by all of the seed-starting mixes out there, while veteran gardeners may have tried just about everything on the shelf to no avail. So what do we do?
In this article, I’ll discuss the various methods used to start your own seedlings, as well as how to make your own mix.
Why make your own seed starting mix and start your own seedlings?
First of all, why go to the bother when we can just run to the garden center and buy everything we need? Well, if money isn’t an issue or if you’re a very new gardener, buying stuff isn’t a bad option. I’ve always taught my new gardeners to keep it simple during the first couple of years as they learn the rhythm of the garden. Learning how to think like a gardener is no small thing if you’ve never done it before, so buying commercial mixes and seedlings can lessen complicating factors.
That’s the expensive route, however.
Last year I ended up paying $85 for seedlings because my starts were too runted and diseased to use. It was an excellent investment, however, paying off in food more than 10x my investment. So buying is a viable way to go.
Starting your own seedlings, however, is much cheaper, plus you get to choose your exact desired varieties. Garden centers will have varieties that grow well in your area, but if you want to try anything a bit more exotic, they can’t help you. Also, if you’re making an emergency run, as I did, you get to pick from what they have left. Starting your own means, you get to pick what you want.
Popular commercial seed-starting mixes
Most commercial seed starting mixes are a mixture of sphagnum moss, perlite, fertilizer, and a wetting agent. Organic mixes are often fortified with things like worm castings as well as kelp, alfalfa, and feather meals. Some even add mycorrhiza! Bonus, right?
While I’ve had good results with Miracle-Gro Seed Starting Mix, the Espoma organic mix that I purchased last year was the cause of my emergency run to the garden center. My plants were runted and diseased and wholly unusable. While runts will often grow once in good soil, diseased runts aren’t worth my time or yours. Others have had good experiences with Espoma, so it’s possible that my problem was a bad batch. That happens with commercial mixes.
Another popular method for seed starting is the Jiffy pellet. These are readily available both locally and online, and relatively cheap. They’re an open wall, net container, and medium all in one that’s shipped as a highly compressed disc. What one does is soak the disc overnight. The disc will expand, and the seed is planted in the medium. Jiffy also makes pots that are allegedly biodegradable. I have not found the pots to degrade well, and I’ve accumulated enough plastic pots to reuse each year to not need those. I’ve had more success with Jiffy pellets by planting them in seed starting mix once the seedling has its first cotyledon leaves.
How to make your own seed starting mix
So how about making your own seed starting mix? The qualities of a good mix are:
- Lightness, so the roots can grow easily through it. This is why garden soil and compost don’t make good seed starters by themselves. They’re too heavy, but they do make a great base for your own mix.
- Water retention, so the tiny roots don’t dry out quite so easily. Coco coir is a common ingredient for this purpose. Leaf mold is also a good option.
- Drainage, so the roots don’t stay too wet and rot. Sand, perlite, or vermiculite are common ingredients for this purpose. Be aware that sand will make your mix a bit heavier.
- Nutrition, that your tiny seedlings have something to grow on. Compost helps, as does the leaf mold. Keep in mind that there are 10 basic plant nutrients. Commercial mixes tend to limit themselves to NPK. Worm castings, finished animal manure, and even plant food will work.
Common recipes for your own seed starting mix are 1 part drainage material, 2 parts water retention material, 2 parts fine-grained compost, and 1/2 part nutrition material. Some basic measuring tools include yogurt cups and ice cream buckets, depending upon how much you plan to make. A sieve to break up chunks is a good idea, and don’t forget the container to keep it all in! Store your mix in a container with a good lid.
More in-depth recipes can be found here and here.
How to start your seeds
Here are some tips for starting your own seeds.
Be sure not to plant your seeds too deeply, or they won’t sprout. Keep in mind that there’s only so much food in the seed (termed endosperm for the science geeks out there), and the plant must reach the light in order to make more food for growth. So, whatever method you use, don’t plant too deeply. Your seed packet will give planting depth.
Heat mats are good. They’re very cheap and will help the seeds germinate quickly, and are almost a must in colder climates. I’ll start my frost-sensitive stuff like tomatoes and peppers anywhere from mid-March to April 1, when it’s still in the 20s F outside. Even inside, plants don’t like that cold. Heat mats also help seeds germinate.
Something I prefer in order to be sure I’m planting good seed is to germinate in a wet paper towel, then plant. I wet a paper towel, put some seed between the layers along with an identifying marker (I use popsicle sticks), wrap in plastic and put on a heat mat. I also have many flat plastic food containers that I’ve saved for this purpose, although a ziplock bag will also work. Cleanliness is good.
Using city compost is free, but there’s no way to know what’s in it. I send my diseased plants to the city compost pile, which may or may not be hot enough to kill undesirables. I’ve seen it do really well and really poorly, as my Master Gardener project used it. Be aware.
Speaking of sterilization, it isn’t a bad idea to pasteurize your own mix. I haven’t found the oven method to work well, but putting my mushroom mix in an old pillow case and sterilizing on the stove for 1 hour did. Unsterilized mix also thwarted my hydroponics operation, as you can read here.
Remember: these mixes aren’t meant to grow plants over the long term. They’re meant to help develop good root systems so the plants will grow quickly once in contact with good soil. So don’t try to grow anything in a seed starting mix over the long term. Seedlings are usually transplanted at about 8 weeks, including hardening time.
Speaking of hardening, it’s absolutely vital that your seedlings are hardened out before transplanting! Otherwise, they’ll die. Plants grown indoors must be acclimated to direct sun, wind, and rain exposure. This is done by putting them out for increasing amounts of time over the course of 1-2 weeks. I start with 1 hour in direct sun, perhaps for 2 days, then double the exposure time every couple of days until they’re happy out overnight. A collapsible greenhouse can help, especially if nighttime temperatures are still in the 40s. These can be purchased cheaply or made from a bit of plastic and some PVC. Cold frames can also help.
When making your own mix you’ll be working with very finely-grained particles that fly in the slightest breeze and are easily inhaled. Wearing a mask and working in a well-ventilated area are both good ideas. Gloves aren’t a bad thing either, especially if you’re working with peat moss and coco coir. These are slightly acidic and your hands will notice. Trust me: there isn’t enough hand lotion on the planet! Wear gloves.
Lastly, if you get seeds anywhere other than commercially, then giving them the hot water treatment isn’t a bad idea. Read about that here.
Be sure to check out our course, Home Agriculture Comprehensive
And that’s it!
So that’s it in a nutshell! Starting your own seedlings is very cost-effective, and you get to try new stuff that may not be available locally. Making your own seed starting mix has its benefits as well and isn’t difficult at all to do.
Do you start your own seeds? What about making your own potting mix? Have you ever had terrible luck with a commercial mix? Share your tips and experiences in the comments section!
About Amy Allen
Amy Allen is a professional bookworm and student of Life, the Universe, and Everything. She’s also a Master Gardener with a BS in biology, and has been growing food on her small urban lot since 2010.


10 Responses
I have used the Jiffy bio-degradable pots in the past. When I go to transplant, I gently tear off the bottom for the roots to be grow down into the ground or container I am planting them in.
Author of Squarefoot Gardening, Mel Bartholomew (RIP) has his “Mel’s Mix.” 1/3 blended compost, 1/3 peat moss, 1/3 coarse vermiculite by volume. I added some pelletized chicken manure too. Worked well.
For up here in the Great White (snowy, we just got 5 inches last night) North, heat mats are a must. Most are just plug in. But I have a regulator for finer control.
Boy, this is a sign lol. I’ve been researching for weeks on starting a garden & now I’m getting info in all directions!
Daisy & authors & OP readers have educated & encouraged me & I am becoming less & less intimidated. Thank you!
You’re welcome! Dive on in, garden and learn. And good luck! There are a number of gardening articles on this site and Frugalite. Just use the Search feature.
I have a great greenhouse to start veggie plants early . My problem is the tiny bugs that attack a healthy plant, sucking out all its life. I’ve been treating them with puffs of food grade diatomaceous earth, because its important to me to have my food organic, but to no avail. Consequently any plants that survive till transplanting time outside are severely weakened. It’s frustrating!
Do you know what specifically your bugs are? That can make a huge difference in how they’re treated.
Have you tried growing some smelly herbs and/or flowers around them? Marigolds are particularly effective but many culinary herbs help as well.
Beware of compost from those city DPW yards if you live in the rust belt. They compost the leaves and debris the city picks up along the streets and the stuff sometimes contains a lot of Road Salt which your garden will not like, as well as dog crap and heaven knows what else.
Desertdove your problem sounds like aphids. The internet is great for identifying garden pest bugs; get a magnifying glass and your computer and get busy. We often have problems with these. We use soapy water, applied with a recycled windex spray bottle to control aphids.
The top of your refrigerator/ freezers works well for a heating mat to sprout seeds.
I have mine going! My seedling rack is full and branching out into other spaces. And it’s glorious!
The best germination method I have seen is I just throw my seeds into a bag of Miracle-Gro seed starting mix then close the bag. Most seeds will have 100% rate in about 2 days. After they sprout, remove each gently & replant into cups containing starting mix. Put under grow light. Spray with water with miracle grow 3 or 4 times a day.