If you're new here, you may want to subscribe to my RSS feed. Thanks for visiting!
Guest Post by John Q. Public
Introduction
And in vain do they worship me, teaching doctrines and commandments of men…. Let them alone: they are blind, and leaders of the blind. And if the blind lead the blind, both will fall into the pit. Matthew 15:9-14
Will you be blind? Will you fall into the pit? Will you be hungry? Will you be eaten? When the chips are down, who will own the night? You or the predators? Will you be cowering in the dark? Will your family be huddled around a flickering candle? What or who lurks just beyond the fading glow of your lantern?
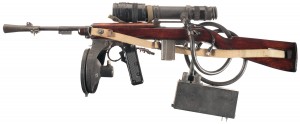
Night vision devices (NVD) have come a long way since the cumbersome gear of World War 2. First used on German tanks, man-portable units quickly followed with development of the Vampir system for the German Stg44 and the “snooperscope” for the M1 Carbine.
Modern NVDs (and suppressors—another article) have made night hunting of depredatory pigs and coyotes very popular. Night harvesting of predators now will gain you worthy experience in the best use of your equipment, stealth, fieldcraft, dressing, and butchery. For “preppers” night vision devices provide an edge in putting meat on the table and offer potential parity with the best-equipped and most dangerous predators. Put pork in the freezer and put ‘yotes out of your livestock. Important math tip: What you save in your food budget and livestock loss, can offset the cost of your gear.
My goal here, as in my recent article on ham radio, is to give an overview of the basics to the newbie to pique interest in learning more. This is a gloss for the uninitiated, not a reference tome for engineers or imaging physicists. For explanations of line spread function, modulation transfer function, gain, temperature coefficient of resistance, pink noise, and other useful comparative specifications, the reader is referred to Bushberg or other imaging physics texts.
I2 and Thermal
There are two broad groups of night vision devices (NVD), Image Intensifiers (often abbreviated “II,” “I^2,” or “I2”) and Thermal Imagers (“TI”).
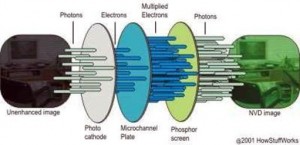
Image Intensifiers use a photocathode tube to take available (“ambient”) visible light (and some invisible infrared light, “near IR”) to generate photoelectrons and then amplify those photoelectrons thousandsfold for display on a screen. Image intensification requires some light, even if it is starlight or a minuscule infrared LED. In complete or near complete darkness, when pitch black indoors, in deep shadows, or when cloud cover outdoors leaves no starlight, special infrared illuminators can provide the necessary invisible light to use an image intensifier. Remember though that use of illuminators reveals your position to anyone else equipped with I2, just as your body heat and hot rifle barrel reveal you to anyone with TI.
The earliest I2 systems were active systems, meaning the user always had to provide a source of infrared illumination, an infrared floodlight like that shown in the picture of the M1 Carbine above. Such “Gen 0” systems were developed and utilized in World War 2 and the Korean “Police Action.”
By the time of the Vietnam War, Gen 1 passive systems used ambient light, usually without need for illuminators. The thousandfold amplification of the Gen 1 units required ambient light equivalent to at least moonlight. The introduction of the microchannel plate further amplified the production of photoelectrons in Gen 2 units resulting in about 20,000-fold amplification of ambient light, justifying the term “starlight scope.”
The Gen 2 multi-alkali photocathodes were replaced by gallium arsenide photocathodes in the Gen 3 units, allowing up to 50,000-fold amplification albeit with more power drain. Each jump in generation gained more sensitivity and efficiency.
Gen 3+ devices (sometimes called Gen 3 Thin Film) added autogating (on-off switching on the order of nanoseconds or picoseconds), hence faster response to changing light conditions such as unexpected bright lights that would have damaged earlier generation devices. Bright lights will cause Gen 3+ NVDs to “bloom,” a “white out,” or shut down the device, but will not usually allow bright light to damage the tube. Autogating is especially useful in twilight or indoors where lighting conditions may suddenly change.
Just as incandescent light bulbs burn out, so too do image intensifier tubes fail. Longer life can be expected from newer generation tubes. Life expectancy (Mean Time to Failure or MTTF) is typically 1,000 hours of use for Gen 1, 2,000 to 2,500 hours for Gen 2, and 10,000 to 15,000 hours for Gen 3 tubes.
I2 NVDs, especially those of the newest generation have excellent resolution and can see through windows and water, so I2 can be used to navigate from within a vehicle. Smoke and fog, however, handicap I2.
The more sophisticated and robust units are predictably more expensive. To some degree the lines between generations have been blurred (pun intended) by Photonis’ introduction of CORE™ (Ceramic Optical Ruggedized Engine) technology that upgrades resolution using ceramic and metal alloy plates instead of the microchannel plate detector.
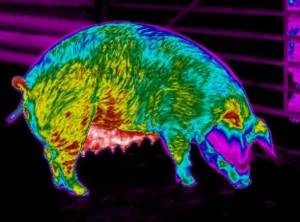
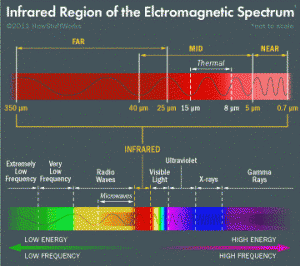
Thermal imagers sense and display the heat, the mid-infrared “light,” emitted by objects and beings. Infrared radiation is emitted by all objects whose temperature is above absolute zero (-273.15° C. or 0° K) Thermal data can be acquired even in pitch black and never requires illuminators, but, because of reflection, thermal sensors cannot “see” through windows or water, so unless externally mounted, cannot be used for navigation from inside a vehicle. TI is not blinded by bright light and can even be used in daylight. TI is generally of lower resolution than I2 and depends on the temperature contrast among objects and beings. While TI can penetrate obscurations like fog and smoke, but TI is handicapped by environmental conditions that mute temperature contrast, such as heavy rain or snow.
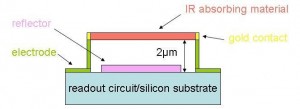
Early thermal imaging devices required very expensive and unwieldy liquid nitrogen cooling systems. Uncooled thermal sensors, microbolometers, were developed in the 1970’s , but were not declassified for sale to private citizens until 1992. The development of the microbolometer has dramatically improved the portability and, though still expensive, decreased the cost of thermal imaging devices. A microbolometer consists of an array of pixels each having an infrared absorbing material (such as amorphous silicon, a-Si, or vanadium oxide, VOx), a reflecting mirror material (such as titanium), and gold contact electrodes on a silicon chip, a readout integrated circuit (ROIC). Minute changes in temperature from the incoming infrared radiation cause measureable changes in the electrical resistance of the detector material. Lower room temperature resistance of the detector material means lower power draw, hence amorphous silicon arrays would be expected to draw less power and have longer battery life, but my search finds only a few handheld viewers and no amorphous silicon array weapon sights available for non-governmental purchase.
Diagram of a single pixel:
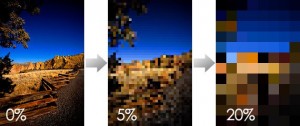
These thermal sensitive pixels are then assembled into arrays. Older pixel pitch measured about 45 µm, but newer pixel pitch measure 17 µm. Arrays range from 160×120 to 1024×768. Larger pixels in smaller arrays mean lower resolution and lower cost; smaller pixels and larger arrays mean higher resolution and higher cost. Digital magnification of the array is available, but pixelation limits its utility. The non-thermal photo series below shows image degradation from increasing percentages of pixelation.
As evident from the variety of TI images in this article, TI data can be displayed in a variety of monochrome (“white hot” or “black hot”) or pseudocolor palettes that use lookup tables.
Fusion
Enter fusion—devices that overlay the I2 and thermal data offering “the best of both worlds”—at a substantial price.
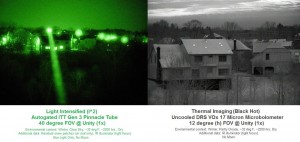
I2 and TI, as I have glossed above, have different strengths and weaknesses. Consider the tasks at hand: detection, recognition, and identification. Can you detect the animal? Can you be sure it is a coyote? Is it the family dog? TI excels at detection, but I2 excels at identification. Combine both and you “have it all.”
Here is a state-of-the-art dedicated fusion imaging device, the AN/PSQ-20 DSNVG (Dual Sensor Night Vision Goggle)—correction, here is a $16,500 state-of-the-art dedicated fusion imaging device:
http://www.willsoptics.com/product-p/an-psq-20-dsnvg.htm
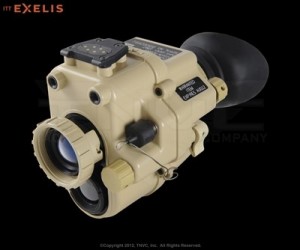
At a lower cost, a “clip-on” TI can be piggybacked onto an existent I2. For example, a $6,700 AN/PAS-29 Clip On Thermal Imager COTI can be piggybacked onto the quite common $3,500 AN/PVS-14 Gen3 NVD.
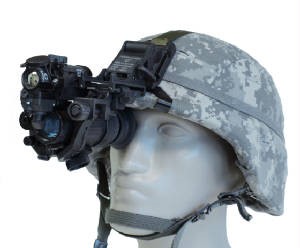
Even at such a cost, entry-level fusion devices are NOT rated for recoil. Though some users have mounted such units on lightly recoiling 5.56mm NATO weapons, doing so is not advisable. Entry-level fusion imaging NVDs are usually helmet-mounted, fragile and cumbersome, but provide awesome imaging capabilities. These can be inexpensively paired with an IR-pointer-equipped handgun or long arm. You can find a video of I2/TI fusion in outline mode here.
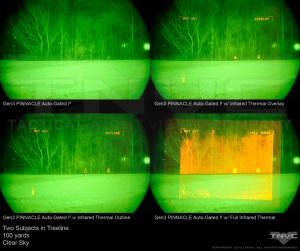
The differences among I2, TI, and variable blending of I2 and TI is well demonstrated in the gallery of captioned photos demonstrating the AN/PSQ-20 DSNVG here.
Be aware that some technologies, including certain image processing software features, are denied to good citizens. If you find forbidden technology for sale or someone offers to “jailbreak” your software, worry that you are being set up for a sting.
Timely, as I was writing this article, Dr. Zhaohui Zhong, assistant professor of electrical and computer engineering and his colleagues at the University of Michigan announced plans for the next generation of NVDs, graphene-based full infrared spectrum contact lenses.
Budget—Buy once; Cry once.
So… what is your budget? The dispositive question! Though the most cutting edge technology always remains expensive, serviceable used equipment is available to the astute and budget-minded shopper. Consider registering at a forum like Sniper’s Hide. Learn at the Night Vision Devices section and shop at the Optics For Sale section. Quickly though! Bargains are snatched within minutes. An important caveat for good citizens—there is a very heavy police and military presence on “the Hide” and the no-politics/no-religion policy is mercilessly applied. Be cool. Don’t taze me, bro.
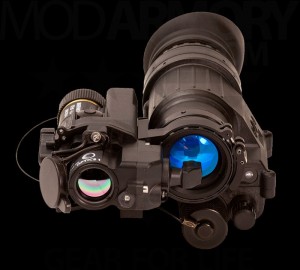
Used Gen 1 I2 weapon sights can be found for as little as $300-$400, but carry no warranty. New Gen 2 I2 quick detachable sights like the ATN PS22 Gen 2+ can be found for as little as $1,615. Other solutions for tight budgets? Pair a head mounted I2 device with an infrared-laser aiming device on a handgun—for example, a $3,400 ITT MODArmory Autogated Pinnacle Gen 3 PVS-14 Kit paired with the $350 LDI LAS/TAC 2 Class 1 IR Pistol Laser mounted on a 10mm or .45 ACP Gen 4 Glock 20 or 21—add a threaded barrel and an $850 AAC TiRant .45 suppressor anyone? You would be adequately equipped for short-range night pig hunting.
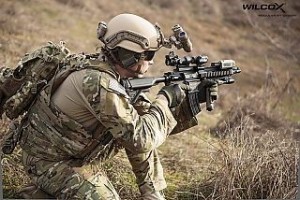
Instead of using a simple headband mount, many hunters mount their monocular or binocular NVDs on ballistic helmets such as those from Crye Precision, Team Wendy, or Ops-Core. A floppy mounting arm would seriously degrade the utility of NVDs, so a well-engineered helmet mounting system is essential. Consider those manufactured by Norotos and Wilcox.
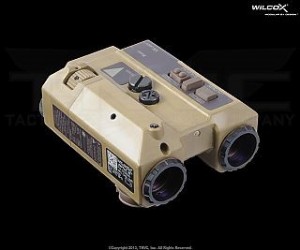
In a related product category, Wilcox combines a lightweight infrared laser, a visible laser, an IR flood illuminator, and a laser rangefinder into a single compact $6,500 unit suitable for rail mounting on a rifle, the RapTar ES. The more powerful RapTar is not eye-safe, so is forbidden to the hoi polloi. A much less expensive $1,595 unit deletes the rangefinder, the RapTar Lite.
Until recently, budget TI sights, for example the ATN Thor320-1x Thermal Sight, would still set you back $5,499. But FLIR, one of the premier NVD manufacturers recently announced the FLIR ThermoSight R-Series. The series includes an entry level TI sight that can be used as a handheld viewer, a stand-alone weapon sight, or as a clip-on in front of a day scope. The entry-level model is recoil-rated up to .30 caliber and priced at $3,499. This entry level RS-24 has a small 13mm focal length, wide field of view, low 240×180 resolution sensor, a 30 Hz frame rate that briefly gives a smear effect for quickly moving hot objects, and no magnification—but this is warrantied thermal imaging from a reputable manufacturer. At the highest end of the series is the RS-64 for which $8,999 buys you a 60mm focal length, narrower field of view, high 640×480 resolution sensor, the same 30 Hz frame rate, and up to 8x digital zoom magnification. The models with 320×240 sensor resolution have a 60 Hz non-smearing frame rate. You can pick your price point and choose any of 6 models. To my thinking, the two major weaknesses of this series are (1) FLIR’s use of a proprietary and relatively short-life (4 hour), but rechargeable Lithium Ion battery and (2) the absence of a miliiradian-based reticle. Those who, unlike me, prefer a minute-of-angle calibrated reticle may dispute the second weakness, but the inability to quickly swap out dead batteries is inarguably a huge deficit. A comparison of images from the low and high end models in the linked brochure provides an immediate intuitive appreciation of the differences far more than would a discussion explaining the technical specifications of the different models.
For higher quality hovering in the $13,500-$14,900 range, you can watch the Battle of the Best, then choose between the FLIR ThermoSight T70 and the L3 Insight AN/PAS-13G(V)1 Light Weapon Thermal Sight (LWTS).
L3 LWTS pigs @ 500yds digital magnification of 1X using ACOG 4X (white hot):
http://www.youtube.com/watch?feature=player_embedded&v=Y0CmP4oXqiA
FLIR T70 pigs @ 500yds cycling through digital magnification of ½X, 1X, and 2X using ACOG 4X (black hot):
http://www.youtube.com/watch?feature=player_embedded&v=trGkueXdRn0
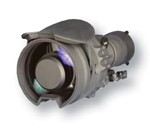
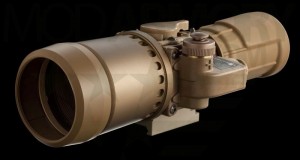
After you have added Thermal Imaging and a laser pointer/illuminator/rangefinder to your battle rifle to mark prey for your companions who are I2, but not TI equipped, consider adding a suitable I2 NVD to one or more of your family’s precision rifles. Again, the high end Battle of the Best is between FLIR and L3, the similarly-priced ($9,000-$10,000) FLIR PVS-27 MUNS (Magnum Universal Night Sight) versus the L3 CNVD-LR.
The PVS-27:
The CNVD-LR:
These quick detachable rail-mounted I2 NVDs should be coupled to a precision day optic, typically in the 4-12X magnification range, though some report good results up to 20X with the CNVD-LR.
Enter the most affordable, but very short range TI, the $350 FLIR ONE personal thermal imager that, as a deal killer, must be paired with that zero OPSEC device, the iPhone.
Whatever your budget, whatever you choose, I urge you to patronize reputable dealers. Among these are, in alphabetical order, EuroOptic, MOD Armory, Tactical Night Vision Company, and Will’s Optics. Joining certain forums can earn you percentage discounts that become significant at the price levels of NVD technology.
Camouflage
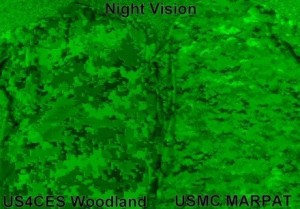
Can these technologies be defeated? Well… not by anything available to pigs and coyotes. While I2 camouflage is rather widely and inexpensively available, TI camouflage is only recently leaking into the civilian market. Outrage over omnipresent intrusive surveillance is spurring interest in imaging counter-measures.
I2 camouflage depends largely on exploiting pixelation:
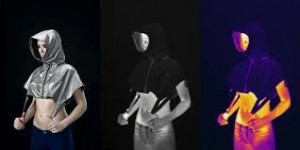
TI camouflage depends largely on containing the emission of thermal radiation:
Ya pays yer money ‘n makes yer choice
Admittedly most NVD technology takes a big bite out of your budget. What are the lives of you and your family worth? At the low end you still have affordable options. Search persistently for the hard to find serviceable $300 used NVD units. Whatever you choose, Prepper, be sure to lay in a stock of batteries.
Good night, y’all. Bacon for breakfast!






5 Responses
Very informative article JQP! Thumbs up!
..ditto, kudos to Miss Daisy for posting John’s article!
Thank you, Hunter. You are most generous in your praise.
Watch 6 (with NVDs) 🙂
John…am covered…day & night!!!!
I am just starting out and have so much to learn still. This article really helped me understand a bit more, but it is still a little confusing. If I was to buy night vision gear, which would be best to start out with. My budget is not too bad, so I can look at a few options. Any suggestions for a newbie?
I have mentioned models in each price class that I think are best. Opinions vary, of course, and you can find some well-educated and well-experienced opinions in the Night Vision section of Sniper’s Hide (see the link in the article).