If you're new here, you may want to subscribe to my RSS feed. Thanks for visiting!
By the author of Dear Diary: It’s Me, Jessica
So in chapter two of Dear Diary, It’s me, Jessica, I mentioned “lard bead.” Long-time reader and regular commenter Val, said, “And I’d love the recipe for lard bread!”
Once again, our OP readers are quick and ahead of me!
Here it is!
The Pre-ferment
What is a “pre-ferment?” It is flour, water, yeast and a little sugar to get the yeast fermentation process going. Usually, it is used to add characteristic flavor to your bread. However, if you let it continue to ferment in the fridge for two to three days, it will have a slightly alcoholic smell to it. This acts as a preservative. Your bread will last five to seven days before mold begins to form, depending on environmental conditions. It is a two-fer; both adding character and flavor, and acting as a preservative at the same time.
- ¼ cup of bread flour (room temperature)
- Water lukewarm
- ½ teaspoon dried yeast
- ½ teaspoon of sugar
Mix the flour, yeast and sugar in a clean bowl. Add enough warm water and mix to form a sticky ball of dough. Cover with a clean, terry cloth-free towel and let sit in a warm (ideally upper 70s to low 80s), draft-free place for an hour to a few hours till it rises, nearly doubling in size. Punch down, cover in plastic wrap, and put in the fridge for two to three days. By the second or third day, it should have a slight alcohol smell to it.
The Bread
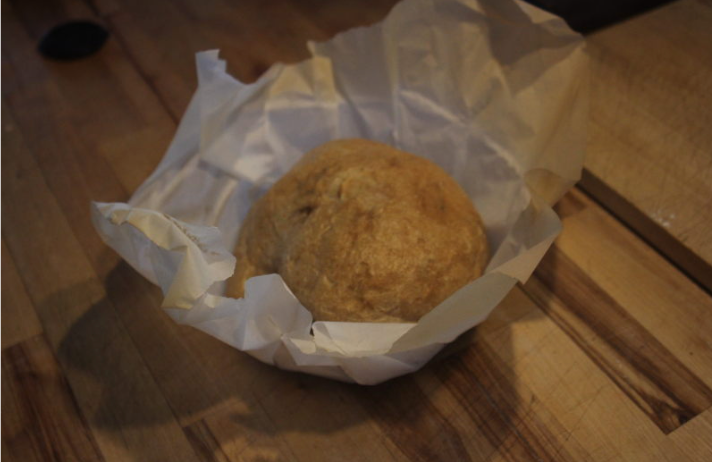
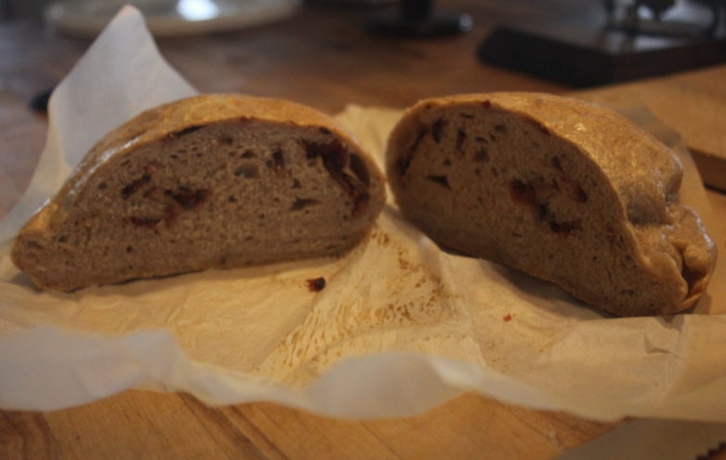
Lard bread is actually a variant of an Italian bread called Casatiello. Casatiello bread adds eggs, butter, chunks of hot smoked ham, cooked fresh or cured sausage, and cheese (note: Val suggested cheese too! She is sharp as sharp cheddar cheese!). In this case, we are going to use lard or bacon fat in place of the eggs and butter. It adds both flavor and the calories that Jack, Jessica, Rae, and Savannah will need for their mission to the city and saves the eggs and butter for other uses.
- 2 cups of bread flour (room temperature)
- 1 cup of whole wheat flour (room temperature)
- ½ teaspoon of dried yeast
- ½ teaspoon of sugar
- 12 oz of luke warm water
- 5 tablespoons of lard or bacon grease in liquid form
- Pre-ferment
- 5 to 6 slices of cooked bacon, crumbled (or diced hot smoked ham, cooked fresh or cured sausage)
- Chunks of a flavorful cheese (mozzarella, smoked gouda, sharp cheddar cheese etc.)
Add the yeast and sugar to the water and allow to proof/become frothy in about 10 minutes give or take a few.
Mix the flours together in a mixing bowl. Add the water/yeast mixture, lard, and pre-ferment. Mix well to form a slightly tacky ball of dough. Add flour or water to adjust accordingly.
Cover with a terry-cloth-free towel and set in a draft-free, warm place to rise. After the dough has risen to about twice its size, turn it over in the bowl, then again about thirty minutes later.
On a clean, lightly floured surface, pour the dough out. Lightly flour the top of the dough. Turn the dough over once then gently stretch it out.
Add half of the meat and cheese. Fold the dough over on itself. Add the other half of the meat and cheese and fold the dough over itself again (If you are feeling really punchy, add a third layer of meat and cheese and fold again!)
Gently form the dough into a ball and place it on a piece of parchment paper. Cover with your towel and allow it to rise again.
Dutch Oven Method
I use the Dutch Oven Method to bake bread. I use a cast iron Dutch Oven or similar heat-proof pot, sized in relation to the size of the bread I am baking.
Place the Dutch Oven or pot with lid into the oven. Pre-heat the oven to 450 degrees.
Once up to temperature, with oven mitts, carefully place the hot Dutch Oven or pot onto a heat-proof surface. Put one ice cube (provides steam for a rich, crunchy crust) in the bottom of the Dutch Oven or pot.
Remove the cloth from over the dough, pick up the dough by the parchment paper, and place into the hot Dutch Oven or pot. Cover with the hot lid.
Return the Dutch Oven or pot to the oven. Set a timer for 10 minutes. After 10 minutes have passed, remove the hot lid and place on a heat proof surface to cool.
Set the timer for 20 minutes. After 20 minutes have passed, check the bread (oven temperatures can vary from oven to oven). Your bread should be a rich, deep golden brown color. If not, bake for an additional 5 to 10 minutes or until you get the desired color. Don’t burn it, though!
Remove the Dutch Oven or pot and place on a heat proof surface. Using the parchment paper, remove the bread and place it on a wire rack to cool.
Enjoy!
Let us know how it turned out if you make it. What would you add into the dough? Is this something you’ll try out?
Let’s talk about it in the comments section.
About 1stMarineJarHead
1stMarineJarHead is not only a former Marine, but also a former EMT-B, Wilderness EMT (courtesy of NOLS), and volunteer firefighter.
He currently resides in the great white (i.e. snowy) Northeast with his wife and dogs. He raises chickens, rabbits, goats, occasionally hogs, cows and sometimes ducks. He grows various veggies and has a weird fondness for rutabagas. He enjoys reading, writing, cooking from scratch, making charcuterie, target shooting, and is currently expanding his woodworking skills.


17 Responses
This is something that I will definitely try. Thanks for the info!
A couple of points in your article:
Unless you are eating the dough raw, all the alcohol will cook off when you bake the bread. Sorry.
When you have a high moisture environment in your oven when you place the bread in it, you allow the dough surface to remain soft and this allows more ‘oven spring’, where that ball of dough rises from the heat of the oven working on the little air pockets the yeast put into the dough. I make artisanal boules and, like you, I always put an ice cube in the Dutch Oven to steam up the environment. But all of a sudden I lost my oven spring and instead of a volley ball sized loaf, I’d get something not a whole lot larger than the ball I started with. Plus, the bread was much denser.
Turns out you can have too much moisture and it can make the dough surface gummy and in the heat it hardens and won’t let the dough expand. Something to keep in mind if you don’t get the loaf you deserve.
RayK
I am not sure I understand “Sorry.” Yes, the alcohol cooks off. But it still acts as a preservative. I have had non-preferment bread go to mold in as little as two days. I have never had a prefermented bread go to mold before day five.
Professional hearths have a steam button to moisten the oven just as they put the bread in. What I would give to have one of those! But I have what I have, so the Dutch Oven method it is!
Peter Reinhart, baking instructor at Johnson & Wales University, author of Crust & Crumb, author of the James Beard Foundation Book Award winning The Bread Baker’s Apprentice, recommends putting a metal tray in the bottom of the oven as it pre-heats, then adds very hot water (simmering) to the tray just before putting the bread in for the steam. For even more steam, he uses a plant mister on the oven walls.
Maurizio Leo, resident bread baker at Food52, regular contributor to the King Arthur Baking blog, when not using the Dutch Oven method and a ice cube, uses a metal tray on the bottom rack and ice cubes. When he needs extra steam, he puts a second metal tray with hot wet towels for the steam. He removes them between ten to twenty minutes depending on the kind of bread he is baking.
Most ovens vent steam pretty well, but they can vary from oven to oven. Had an electric oven that had hot and cold spots and I had to turn the pan 180 degrees at the half way point. Say what they want, I love my gas oven!
The loaf will have an internal temp of around 205F when it is done. The alcohol is gone, and there isn’t any left for mold suppression. With the pre-ferment being the difference, I’d suggest that there may be a pH lowering in the pre-ferment loaf that carries through the baking process. You wipe hard cheese with a vinegar dipped paper towel to remove mold and you can wrap a paper towel dampened with white vinegar around the stored hard cheese to keep mold from forming-period. Lower pH suppresses mold.
I’ve used the hot pan with hot water to steam the inside of my oven when I put the loaf on the baking stone. I’d suggest that you not use a sheet pan for the steamer, but use a cast iron pan. That sudden temp shock, even with a cup of near boiling water, might warp your sheet pan. I quit doing it this way because of hot water splatter and steam near-burns. Much easier to use a Dutch Oven.
Yes, to be able to use enough bread to justify a steam-oven would be wonderful, but I don’t eat enough and can’t afford the real estate in my kitchen. You make choices and adapt to your reality. Like you, I love my gas oven.
Once my loaves have cooled, for a day or two I leave them, cut side down, unwrapped, on a cutting board on the counter. After that, I use a Bee’s Wrap wrapper, which is bee’s wax impregnated cloth that you wrap around and seal the loaf. They make a few different sizes depending on what you are wrapping. Not a dealer, but a very satisfied customer.
And to repay all the info you’ve shared, let me suggest that you add 1/2 tsp Dry Malt Powder to the dry ingredients. It won’t affect the flavor of the bread, but oh, the change in oven lift! You might even have to provide some surface cuts pre-bake to control the expansion of the loaf. Without the cuts the loaf can split anywhere and the results may not be pretty. To get those crisp and decorative ears, cutting the top of the loaf (look at the slice marks on a baguette to see what I’m talking about) helps to direct the openings and makes a very appealing loaf.
Cutting can be done with a razor blade (or a razor blade on a stick called a lame), an Exacto knife, or with some practice, a serrated knife. Youtube has lots of instructional videos.
I would like to try this as a sourdough, seems like it would be almost the same! I cook my sourdough in a dutch oven and have never needed to add water since my hydration levels are high enough. But when I cook it on a pizza stone, I have a cheap roasting pan filled with lava rocks that I pour the water on to make and steam and it works wonderfully! I use that when I’m making cheesecake, too!
Thanks for the heads-up. This loaf is only 50% hydration, so an ice cube would probably be necessary.
Thank you, sir!
I will give this a try.
Wonder if the alcohol in the pre-ferment kills off bad bacteria in the rest of the ingredients after it is mixed in and the dough rises?
Maybe that buys more time for the bread to stay mold-free?
Thanks again!
I just wish there was a print button so one can easily print and/or save the recipe.
Looks wonderful and a good excuse to spring for a Dutch oven!
Does anyone really need an excuse to buy a Dutch Oven? 😉 Or in my case, three of varying sizes to include a outdoor one!
This sounds wonderfully awesome! Read the article to my husband and he said, “Make some!” So I will. Thank you for the recipe!
Great! Have fun with it!
“Return the Dutch Oven or pot to the oven. Set a timer for 10 minutes. After 10 minutes have passed, remove the hot lid and place on a heat proof surface to cool. ” You’re just taking lid off and leaving pot in oven, right?
If I would like to skip Duth oven and just bake on sheet pan, what would instructions be for temperature and time? When I bake bread, I was taught to toss in about a quarter cup of water to the bottom of the oven for the steam.
Bread is such a staple food! It’s good to know multiple ways to make it, depending on what you have available to cook with. I have lived in the South for a long time and never heard of this. I’m going to add it to my recipe box.
> missouri patriot says:
> January 17, 2025 at 9:34 am
> I just wish there was a print button so one can easily print and/or save the recipe.
Hi, missouri patriot. (Sorry for the out-of-thread reply.)
To print, have you tried mouse-selecting the recipe and then either (1) selecting your web browser’s “Print” function and specifying “Selection” or the equivalent; or (2) copying the mouse-selected material, pasting it into a text-processing application such as WordPad, and executing that application’s “Print” function?
I just copy and paste the highlighted section into Open Office and save it. Then I can print it any time I want to.
Oh, I’ve never heard of a pre-ferment, but I’m going to give it a try!
A suggestion, if I may: When I add veg or meat or cheese to a bread, I give it a shake in a jar of flour, especially if the addition is wet (like olives). This keeps it from making the bread gummy in the area of the additions.
You Tube artisanbreadwithsteve. He teaches you how to make bread with very little & its easy.
He has developed a way where there is no kneading for those who cant or just don’t have the time.
I have used his recipes and all,so far , have been great. Pray this helps.
I’m going to give this a try. It’s very similar to the Cuban bread recipe a friend shared with me, which uses lard instead of butter or oil, which I think makes a real difference in the texture. One difference that I’ve never tried is mixing the cheese and bacon in. Looking forward to trying it.
I have heard of doing the pre-ferment in the fridge, but haven’t tried it. I’ve got sourdough starter that I’ve been keeping on the counter and feeding daily. The discard gets used in a multitude of things, and crackers are a great, and easy, way to use it.
My oven is electric (dual fuel range with gas burners. This as a shock as I thought it was all gas when we bought it, and well, it was part of a renovation but still required a good bit of Sheetrock repair and electrician expense because it required a non existent 60A circuit). The oven has a steam bake mode with a tray for the water. I think it works really well.
I also use bread bags and they seem to keep it fresh, but we will see what happens come spring when everything molds faster.
In any case, if the comments stay open I’ll post a review.