If you're new here, you may want to subscribe to my RSS feed. Thanks for visiting!
By the author of Prepper’s Natural Medicine and Prepping for a Pandemic.
Do you have a dental kit for your bug-out bag? I’ve seen a lot of great bug-out bags loaded up with all manner of tacti-cool gear, tiny first aid kits stuffed into Altoid tins, and ultralight camping supplies. That’s wonderful and all, but where’s the dental kit?
For new preppers, a bug-out bag (BOB) holds the supplies you need to evacuate from your primary location to your (presumably safe) secondary location. Your bag is intended to get you from Point A to Point B.
Your Bug Out Bag Needs a Dental Kit
Since you aren’t living long-term out of your BOB, you may not think that dental supplies are as important as other supplies, like a good knife or paracord. After all, what’re a few days without brushing your teeth going to hurt, right?
Mouth pain is no joke. Imagine you ended up with some food stuck between your teeth. I find that wildly irritating and have to get it out. Otherwise, the gum swells, becomes tender, and sometimes bleeds. Food can stay stuck there, rotting, causing bacteria to breed like rabbits. Next thing you know, you have an infection.
If you think mouth pain is miserable now, imagine it post-SHTF, with no access to a local pharmacy and no local dentist. Why deal with that, when simple brushing and flossing can dislodge that bit of beef jerky from your teeth?
Here’s another example for you. You are bugging out, and while eating, a cap breaks off or a filling comes out. If you have the right supplies, you can fix that and get on with your bug out. Hopefully, there is a dentist where you are going. And hopefully, that dentist’s office and still has power. But, imagine having to finish your bug out with an open cavity in your mouth.
You could fall and end up with a wound in your mouth, lose a tooth, or a half-dozen other things that are prevented by regular, daily dental hygiene. If this is going to be a long-term bug out, daily hygiene becomes even more important to prevent cavities, gum disease, and infections.
Dollar Store Dental Preps
Everyone gets strapped for cash once in a while. Some of us pinch pennies more often than others. While wholesale clubs and buying in bulk may give you the best deal for your dollar, not everyone has the cash up front to pay for a 5-pack of family-sized toothpaste. Never mind that the family-size toothpaste is way too big for a bug out bag anyway.
While I have dental kits for our family’s emergency bags already, I decided to try a dollar store prepping experiment.
- First, I would raid my local dollar and discount stores for dental hygiene supplies.
- Second, I would make dental kits out of these supplies suitable for a 72-hour bag.
- Third, I needed to keep the cost of each individual kit under $10
Shopping Trip for Dental Preps
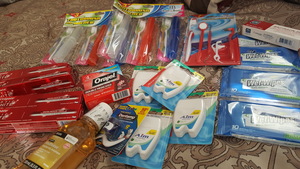
The first store I went to was Dollar Zone. I spent $10 and bought a bunch of stuff. I wasn’t able to find everything here. But, I did pick up some important items, plus a couple of non-dental items because I couldn’t pass them up.
Items purchased at Dollar Zone:
- 3-pack of toothbrushes and travel cases, 2 packages
- Dental floss, 4 containers
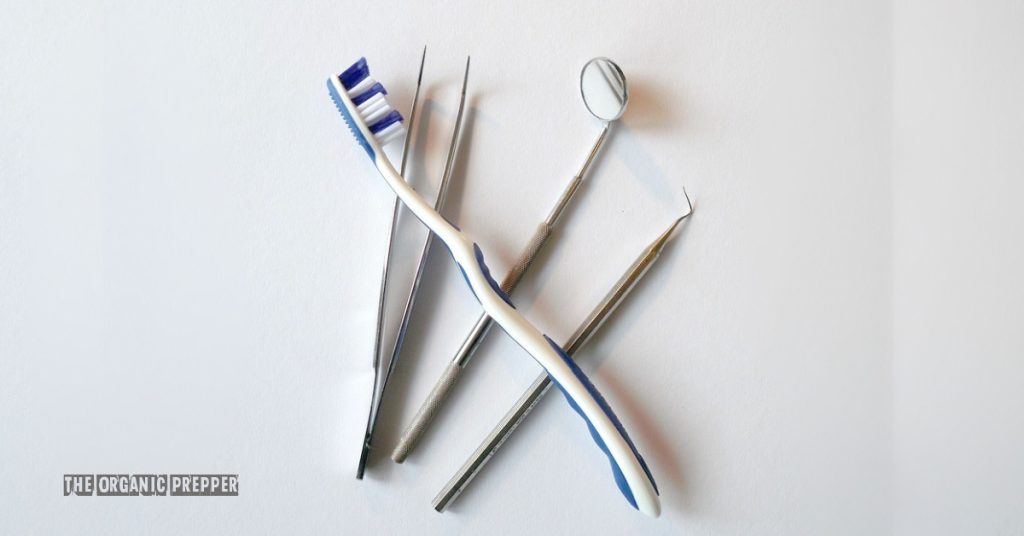
- Dental instrument kit (mirror, explorer, probe, flossers, etc)
- 3-pack of wet wipes (so many hygiene uses for these)
- Antibiotic cream (not dental, but went into my general supplies)
My Dollar Zone total was $9.50 with tax. I would have picked up toothpaste here, but they had no small tubes of toothpaste at all. Everything was just too large to make sense in a bug out bag.
Next, I went to Family Dollar. This technically isn’t a “dollar store” where everything in the store costs just a buck. But, it’s a discount store that’s very similar. I made a couple of cool finds here.
Items purchased at Family Dollar:
- Toothpaste, 4 small tubes for $2.50 each
- Temporary repair kit for fillings and caps for $3
- Orajel, Double Medicated, for $3
- Antiseptic mouthwash, $1
Total Family Dollar total was $18.06 with tax. The receipt also had a $5 coupon off a purchase of $25 this coming Saturday only. There were a bunch of other items there perfect for budget prepping, from bug out bags to food storage to first aid kits. I will make another dollar store prepping trip this Saturday, and let you know what cool preps I find.
Organizing My Dollar Store Dental Kits
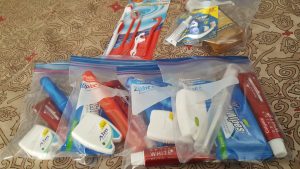
I brought my new supplies home and organized them into four kits in ziplock bags. BOBs will get tossed about frequently on a bug out. If you’re careless or have an accident, you could bust open some of your containers. The ziplock bags will reduce the risk of tubes and bottles spilling inside the bag.
Each of the kits got the basics: a toothbrush, toothpaste, and floss. Each of our bug out bags has water bottles with filters. Just a tiny amount of water is all you need to get your teeth and gums clean.
I also put the antiseptic mouthwash, Orajel, and dental repair kit in its own ziplock bag. This will go with the dental instruments with my general first aid/medical kit. The mouthwash can be used to disinfect the mouth in case of injury and/or infection, but also if you get a cut or small wound. Yes, it will burn, but it’s better than letting an infection spread.
Additional Resources:
Cost Per Kit
I ended up with four personal dental kits, and one general dental exam/emergency kit. I also added the wet wipes packs I had to three of the kits (see next section below). Here’s the breakdown.
Personal Kits
- Toothbrush & case, $0.33
- Toothpaste, $2.50
- Dental Floss, $1.00
- Wet wipes, $0.33
Total expense for each Personal Kit = $4.16
Dental Exam/Emergency Kit
- Dental Instruments, $1
- Antiseptic Mouthwash, $1
- Temporary repair kit for cavities and caps, $3
- Oragel, Double Medicated, $3
Total expense for Dental Exam/Emergency Kit = $8
I spent a total of $28.56, with an extra antibiotic cream not included in these kits. That might sound a little high. Keep in mind, however, I put kits together for 4 people. If you are making a kit just for yourself, clearly, you wouldn’t spend as much. If I had made these for one person, the total cost for one personal kit and the exam/emergency kit would be $12.16. Here is a video I made of the final results.
How to Upgrade the Kits
These dental kits can easily be upgraded into decent general hygiene kits. I only had three packages of wet wipes, so I added one to three of the kits. I should have picked up another package of wet wipes because they are really useful for staying clean when water is at a premium. Wet wipes can be used to wipe your face, underarms, and hands instead of wasting water when camping or bugging out. And, for $1, you really can’t go wrong.
I would also add a small bottle of hand sanitizer. In general, I’m not a fan of hand sanitizer. It is a factor in creating antibiotic-resistant bacteria. Soap is almost always a better option as the friction from the suds physically removes pathogens, as opposed to killing them. However, when bugging out, you want to conserve water. Some wet wipes followed by hand sanitizer will help keep waste and harmful pathogens off hands, and therefore off food and everything else you may touch.
Over time, you can upgrade the contents with smaller, lighter supplies. For example, folding camping toothbrushes are really handy. You can also replace the toothpaste tubes with toothpaste tablets, eliminating the possibility of the tube leaking. You can find all manner of space-saving camping gear to shrink the size of your kit.
Get Something Together Today
The whole point of this exercise was to get something together immediately with minimal resources. Are these the best items possible? No. Can you improve and expand over time? Absolutely. It doesn’t matter if you can’t afford a bulk purchase of mouthwash or a specialty folding toothbrush today. But waiting until you have the money for the perfect gear means you’d have nothing ready if a disaster happened today.
Do you have a dental kit in your bugout bag? What about at home? What items do you keep in your own dental kit? Let’s talk about it in the comments section.
About Cat
Cat Ellis is an herbalist, massage therapist, midwifery student, and urban homesteader from New England. She keeps bees, loves gardening and canning, and practice time at the range. Cat is a member of the American Herbalists Guild, and the author of The Wuhan Coronavirus Survival Manual, Prepper’s Natural Medicine and Prepping for a Pandemic.








16 Responses
Great suggestions! I will add these items to my bugout bag.
You can get free toothbrushes, mouth rinse, toothpaste, and floss when you go to the dentist every 6 months. You can ask them for a couple of each every time you go.
Great ideas, except for toxic toothpaste and mouthwash. Pack hydrogen peroxide for both. Brush teeth, mix with water and baking soda its a great mouthwash useful for cuts or cleaning. Bentonite clay made into a paste as needed weighs less as a powder and also useful for poison ivy, insect bites etc. Think dual purpose
I agree on the baking soda, peroxide is best but water would suffice. I suggest using it now to get used to it and to enjoy the benefits of it now, as well.
I dilute the peroxide, or use full strength…and dry powder on a wet brush..you can feel the clean afterwards..
Another great article! I have to laugh a bit, considering how many of my supplies come from Dollar Tree and 99 Cents Only. It’s a wonderful source for some old fashioned remedies as well as 50 mg diphenhydramine gelcaps for use in allergic emergencies.
Anyway, I had a question about a subject you’ve brought up before. You’ve indicated that you try to avoid alcohol based hand sanitizer because it leads to antibiotic resistance. I’d love to know more about that because I don’t see how that can be. After all, alcohol isn’t an antibiotic and it kills bacteria and viruses in a different way.
Sorry for the populist source, but Livestrong.com had this to say and it makes the point I’m trying to get at very well:
“Alcohol is the active ingredient in hand sanitizers. The alcohol, usually ethanol, isopropanol or n-propanol in concentrations between 60 to 85 percent, deactivates bacteria and viruses without using antibiotics. These alcohols deactivate a broad range of microbial agents and are more effective at killing microbes than antibacterial or plain soaps. Additionally, the alcohol quickly evaporates, limiting the time bacteria and viruses are exposed to the sanitizer. Bacteria require prolonged exposure to antibiotics to develop resistance. Hand sanitizers contain no antibiotics. Even if the microbes develop resistance to the alcohols in hand sanitizers, they will remain susceptible to antibiotics.”
Thoughts?
(By the way, I agree about the mechanical action of soap.)
Hand sanitizers not only kill harmful bacteria but also kill off the good bacteria we need to help with immunity and fight off infection. Several essential oils help fight bacteria. I prefer to use tea tree and oregano with witch hazel as a base. Tea tree is an oil that I would consider a necessity in your first aid kit as it has many uses. For example, years ago I broke out with shingles rash after getting an epidural steroid injection (these can make you more susceptible), I applied coconut oil with tea tree oil and the rash was dried up within 2 days and never spread. I also make a tooth powder for brushing and after I dip my toothbrush in it I add a drop or 2 of tea tree oil. Just a couple examples.
I would also suggest buying cloves, either whole, ground or clove oil as it is a wonderful remedy to treat tooth aches and cavities. It doesn’t have any permanent effect but can provide much relief when needed.
Yes! I have a blend that contains clove oil and it is amazing for tooth aches. I use plant therapy essential oils but It’s comparable to Young Living thieves oil.
I think one of the most valuable preps you can invest in is dental work. I know this is an impossible goal for many people due to how much dentists charge. I know many people continually use temporary fillings from emergency dental kits, month after month, because they can’t afford to pay a dentist. I will only say, if there is any way you can financially make it happen, getting dental work done is a valuable prep. I have known Americans to go to foreign countries to get extensive dental (and medical) work done inexpensively, but then of course you’re paying for airfare etc. I once had a dentist charge me a sum of money equal to one of my paychecks to replace a crown; was thankful I had the emergency fund to cover it.
You’re so right, Maggie! There are things we just shouldn’t put off because those things will come to a head at the worst possible time.
I like your article and how it brings out suggestions from readers. I have made a toothpowder out of baking soda, salt, and mint, cinnamon, or other flavor. The salt had to be ran through a blender. It was too abrasive otherwise. It worked when put in a little water for a mouthwash as well. Too much sodium, so not good to swallow. I wonder if anyone has a swish and spit recipe? Some otc lidocaine ideas? I will be looking for the dental tools mentioned, great idea. Thanks!
I would add a pen light, the ones that nurses use. It really helps illuminating the trouble spots and gosh you can see things so much clearer.
I always have clove oil available. It dulls the pain of a toothache.
I highly recommend adding Clove Oil to Emergency Dental Supplies. Cloves contain Eugenol. Eugenol is the primary ingredient in medicated fillings Dentists use to fight and infection in a tooth. It is antiseptic, antibacterial and also acts as a pain reliever (longer lasting than the Benzocainr in OraJel).
Do not use the Oil directly on you tooth or gums. It will burn the surrounding gum tissue. It needs to be diluted with another oil. Sweet Oil, a purified Olive Oil is perfect for dilution, though regular Olive Oil will work. I start with a 5:1 dilution (5 parts Olive Oil to 1 part Eugenol Oil), but have gone as high as 3:1 for severe pain infection.
I even keep cans of whole Cloves in our E Dental Kit. In a pinch, placing a whole Clove next the the effected area and your cheek will offer relief from the pain and help fight the infection.
Great kit , I carry the same plus whole cloves and clove oil (on some people cloves works better than oragel) , mint oil and prickly ash bark ( toothache tree ) . I have used the dentemp but you have to have help . There must be an unwritten rule that fillings can only fall out on 3 or 4 day weekends when all dentists are closed , at least that has been my experience .
Thankyou for bringing up this subject , this is not just needed during big events but for those occasions to keep pain down.
There is reason to keep hurting when you don’t have to .
For years, I’ve been using an herbal dental formula rather than toothpaste. When I first tried the formula, I was pleasantly surprised by the results after only a few days. Its ingredients include bayberry, echinacea, cayenne, tea tree oil, and peppermint oil. I found the formula in the book “Curing with Cayenne,” published by Sam Biser. (Disclosure: I have no affiliate or other business relationship with Mr. Biser.)